When Henry Gantt invented his planning chart is was actually used for scheduling resources in a machine tool shop in the 1910s. Patrick Weaver has an exclent article describing the historic use of a Gantt chart at http://pmworldjournal.net/wp-content/uploads/2012/11/PMWJ5-Dec2012-WEAVER-Henry-Gantt-Debunking-Myths-Featured-Paper.pdf. Interestingly Henry Gantt did not work on project management at all, he was a colleague of Frederick Taylor who developed the school of scientific management which eventually leads the the mass production. This resulted in the standardisation of production and transfer of power from the artisan to the production engineer, but that (an the parallels with project management) are another story.
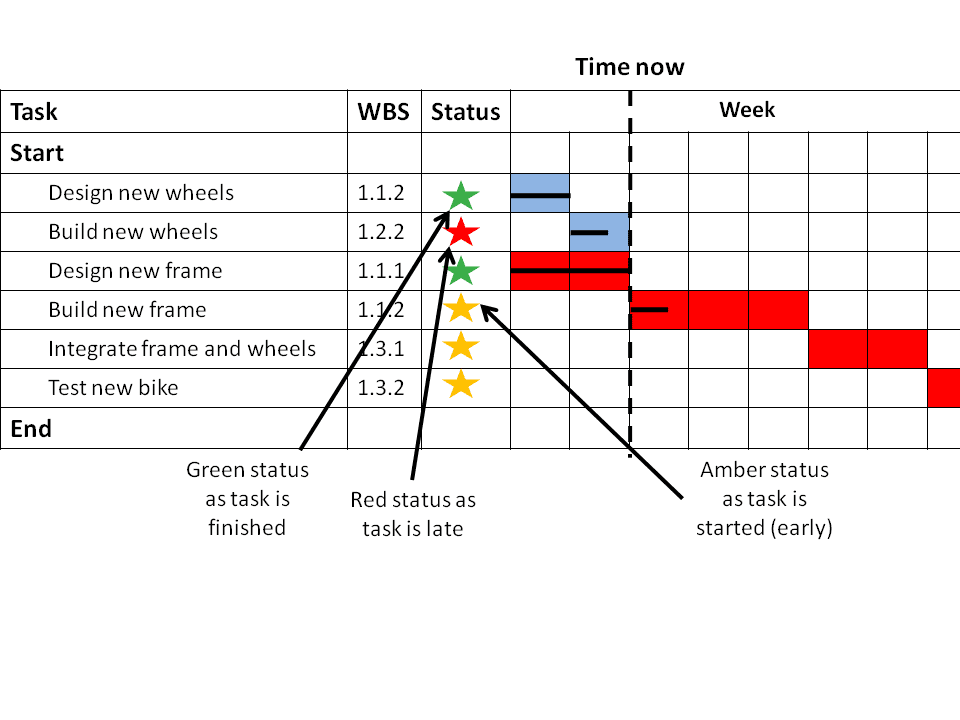
Today Gantt chart is used to refer to the project schedule commonly produced by planning software. It is a useful way of showing activities against time. This is popularly used in project management. The activity list is displayed on the left and the time scale is at the top. A bar is used for representing each activity, with the length and the position reflecting the date of beginning of the activity, the duration of the activity and the end date. Thus, when you view the chart, you can view the following at a glance –
- The various activities
- Beginning and end of each activity
- Duration of each activity
- Where one activity overlaps with other
- The quantum of overlap
- The start date and end date of the project
To summarize, Gantt charts graphically show the progress of projects. Project management becomes easier when viewed in small items and there is a visual illustration of dependencies. 
How to draw a Gantt Chart
Step 1 Define the Activities
To chart the project, collect the sub-tasks in a spreadsheet or planning tool like Microsoft Project. Task name, start date and duration of project should entered into the tool, ideally using a work breakdown structure to give the plan an overall structure. The Gantt chart uses the dependencies between these takes to workout the project duration. These tasks will have to be done in a prescribed order. For example, if you are making a move to a new office space and you want to redesign the space; but, you can’t begin the work of redesigning before you sign the lease agreement. Many people use mind mapping or other techniques such as the rope of scope to define the tasks that are included within the project. These will help to ensure that you do not miss any details. After the completion of the project plan, enter the available data in the Gantt application for creation of the Gantt chart.
Step 2 Link Tasks in Gantt Chart by to Show Dependencies between tasks
Normally, project plans have tasks that will be performed in a prescribed order. For example, if a book is to be published, it must be first written and then proofread and edited. Only then can it be published. Similarly, you can link tasks in Gantt chart, from the beginning to the end, using the Gantt application. The following task will depend on the preceding one. This means that before you start with a new task, the preceding task must be completed. The Gantt chart shows this by joining tasks with arrowhead lines that indicate the direction of the tasks. There can be more than one predecessor and similarly, more than one successor. Linking the task by this method is what makes Gantt chart so powerful. You can make changes as you go along, adding or removing dates, increasing or decreasing the duration and others.
- Adding Lead and Lag Times to Gantt Chart- While linking tasks, it is also possible to add lag or lead time for extending a link in the forward or backward direction so that the date of beginning the successor task can be changed.
- Adding Constraints on Gantt Chart – What are constraints? They are the amount of flexibility available by imposing certain restrictions on the starting or ending date.
Step 3 How to Enhance a Gantt Chart
Gantt applications have features for making the Gantt chart more user friendly. These features can vary from one application to another. Given below are some examples –
- To add explanatory notes. This is very useful for tasks with constraints that override links and can cause schedule conflicts.
- To highlight critical path for viewing those tasks that directly affect the end date of the project. The critical path is corresponding to either the tasks or the linked tasks that have to be completed on schedule or the succeeding tasks will be delayed, thereby delaying the whole project. It is, therefore, essential to keep an eye on the critical tasks and their status. In case the duration of the overall project is very long, then shortening the critical path is the only way to shorten the project.
- To set deadlines and milestones for marking key dates. The milestone will appear as a symbol on the Gantt chart. It indicates important dates, quite often goals. Although the symbol does not affect the calculations on the Gantt chart, its presence serves as a continuous reminder. It is a warning when the task continues beyond the deadline.
- To give priorities to tasks
- To show completion percentage for tasks.
- To customize the overall appearance plan of the project on the Gantt chart by changing the color of the task bars and others.
Software planning tools.
There are wide range of software tools to help you draw a Gantt Chart. This is not an exhaustive list just some of the tools I have used.


This is an appallingly bad article –produced either through ignorance or worse – the author knows the example discussed is total rubbish and is appealing to the lowest common denominator in a dumb commercial market.
1. The diagram is a BAR CHART. Henry Gantt’s charts bear no resemblance to the diagram they never did and never will – Microsoft cannot re-write history! See: http://pmworldjournal.net/wp-content/uploads/2012/11/PMWJ5-Dec2012-WEAVER-Henry-Gantt-Debunking-Myths-Featured-Paper.pdf
2. Unless you are a close personal friend of Dr. Who to have some other means of time travel scheduling incomplete work in the past is stupid. Incomplete work has to be accomplished in the future and affects all other incomplete work.
I always though Project Accelerator was a reasonably useful site! Teaching people wrong information is works eth teaching them nothing at all.
Patrick
Thanks for the feedback and your link was extremely informative. You are of course entirely correct, I was trying to provide a simple description for a novice PM about how to go about drawing a schedule, but having read your comments and reference I think I may have rushed it a little. I think it best if I unpublish the article and re-work it for the future.
Paul